Beautiful Plants For Your Interior
Beautiful Plants For Your Interior

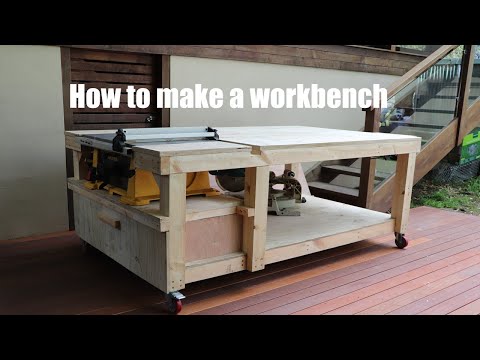
To build a basic table saw workstation, follow these steps:
With these simple steps, you can easily build a basic table saw workstation using common materials and tools.
If you’re a woodworker, you know the importance of having a table saw. It’s an essential tool that can help you create straight and precise cuts. But to get the most out of your table saw, you need a workstation that can support and enhance its capabilities.
In this article, we’ll show you how to build a basic table saw workstation. Whether you’re a beginner or a seasoned woodworker, you’ll find this guide helpful in setting up your workspace.
Before we begin, you’ll need the following materials for this project:
Start by cutting the plywood into the following pieces:
Once you’ve cut the plywood, you can cut the 2" x 4" boards to the following dimensions:
Finally, cut the 4" x 4" posts to the height you want your table saw to be. We recommend 36 inches for a comfortable working height.
Take the four 2" x 4" pieces and screw them together to form a rectangle with inside dimensions of 24" x 48". Use the 2 1/2" wood screws to attach the boards at each corner.
Attach the legs to the base frame using 4" wood screws. Make sure the legs are level and flush with the corners of the frame.
Take the 33" pieces of 2" x 4" and attach them along the inside of the frame, creating a support for the top of the workstation. Use the 2 1/2" wood screws to attach the braces, placing one at each corner.
Place the 24" x 48" piece of plywood on top of the support braces, making sure it sits flush with the edges of the frame. Use the 1 1/4" wood screws to attach the plywood to the braces, placing screws every 6 inches.
Attach the 23" pieces of 2" x 4" to the legs, 10 inches from the top of each leg. These will serve as supports for the shelves.
Place the 24" x 24" pieces of plywood on top of the supports to create two shelves. Attach them using the same method as you did with the top.
Place your table saw on top of the workstation and make any necessary adjustments to ensure it’s level and stable. You may want to add additional support or bracing to the workstation if necessary, depending on the weight of your table saw.
Congratulations! You’ve now built a basic table saw workstation that will provide a sturdy and functional space for your woodworking projects.
Building a basic table saw workstation is a great way to enhance your woodworking capabilities. With just a few materials and some basic tools, you can create a sturdy and supportive workspace that will help you tackle any project.
Remember, safety is key when using any woodworking tools, including a table saw. Always wear proper safety gear and follow all manufacturer’s instructions.
To build a basic table saw workstation, you will need a few key materials including plywood, lumber, screws, wood glue, and a table saw. You may also want to consider adding casters to make the workstation more mobile.
While some woodworking experience is helpful when building a basic table saw workstation, it is not necessary. With the right materials, tools, and guidance, even a beginner can successfully build a functional and sturdy workstation.
Depending on your level of experience, building a basic table saw workstation can take anywhere from a few hours to a full day. It is important to take your time and follow the instructions carefully to ensure the best results.
Yes, a table saw is necessary to build a basic table saw workstation as it is designed to fit around the saw and provide a stable working surface. It is recommended to have a table saw with precise measurements and stability in order to complete the project accurately and safely.
Yes, one of the benefits of building your own table saw workstation is the ability to customize it to fit your needs. You can add additional features such as storage compartments or dust collection systems, or adjust the size and height of the workstation to fit your specific workspace.
Yes, safety should always be a top priority when working with power tools. When building your workstation, it is important to follow safety guidelines such as wearing protective equipment and ensuring the stability of the workstation. When using the table saw, make sure to read the manufacturer’s instructions carefully and always use the appropriate safety measures to prevent injury.