Beautiful Plants For Your Interior
Beautiful Plants For Your Interior

To properly clamp material on a miter saw, secure the material against the fence and then slide the clamp onto the material. Once the clamp is in position, tighten it until the material is secured firmly in place.
If you’re a woodworker, you know that having the right clamp is essential for making precise, accurate cuts on a miter saw. Selecting the proper clamp can make all the difference in the finished product. In this blog, you’ll learn how to choose the right clamp for your miter saw and how to correctly use it for optimal results.
You’ll also get to know the different parts of the miter saw and understand the importance of positioning and securing the material correctly. Once you have the right clamp and material in place, you’ll learn how to adjust the clamp and make the best cuts on your miter saw. Finally, you’ll find out how to safely remove the clamp and complete your project.
Whether you’re a beginner or an expert woodworker, this blog will teach you the fundamentals of clamping material on a miter saw so that you can get the most out of your project.
Clamps are essential when it comes to ensuring your material stays in place while you’re cutting it on a miter saw. You want to make sure you’re using the right clamp for the job, so you don’t run into any problems. Here’s a few tips on selecting the right clamp for your project.
Firstly, consider the size of your material. The clamp needs to be big enough to hold the material securely in place, but not so large that it’s awkward or uncomfortable to use. If the clamp is too big, you’ll be struggling to maneuver the material into place on the saw.
Secondly, consider the type of material you’re working with. Different materials require different clamps. For example, wood can usually be held in place with a standard clamp, but metals may require a different type of clamp. Make sure you know what kind of material you’re using before selecting a clamp.
Finally, consider the type of project you’re working on. If you’re making a complex cut, like a compound miter cut, you may need a different type of clamp than you would for a basic cut. Make sure you’re selecting the right clamp for the job.
Selecting the right clamp is essential when it comes to working on a miter saw. Consider the size of your material, the type of material you’re working with, and the type of project you’re working on to make sure you’re choosing the right clamp for the job. With the right clamp, you’ll be able to make clean and accurate cuts while keeping your material in place.
If you’ve been asking yourself “How do I properly clamp material on a miter saw”, you’ve come to the right place! Whether you’re a beginner or an experienced woodworker, understanding the miter saw is key to clamping material securely and safely.
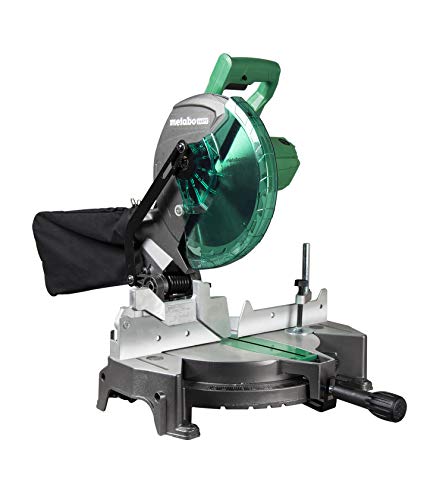
First, it’s important to understand the anatomy of a miter saw. It consists of a blade, a base, a fence, and a handle. The blade is the part of the saw that cuts through the material, the base supports the material, the fence is an extension that allows you to adjust the cutting angle, and the handle is what you use to trigger the saw.
Once you’ve familiarized yourself with the miter saw, you can begin to clamp your material. The best way to do this is to use a miter saw stand, which can hold up to 1000 pounds. This stand is designed to securely hold the material in place while you make your cuts.
When you’re ready to clamp your material, make sure that it is firmly pressed against the fence and the base of the saw. Then, use a clamp to secure the material to the fence and the base. Be sure to use a clamp that is strong enough to hold the material in place.
Finally, when you’ve clamped your material, double check that it is secure and that it is not moving while you make your cuts. If you feel that it is not secure, it is best to make adjustments to your clamp or the fence before you start cutting.
By taking the time to understand the miter saw and properly clamp your material, you can ensure a safe and secure cutting experience.
Positioning the Material is the key to successful and safe miter saw work. Before cutting, you should always place the material firmly and securely against the fence, saw blade guard and the miter saw table. Make sure that the material is not only flush with the fence, but firmly held in place so it can’t move during the cutting process. If the material is not properly clamped, it can cause kickback and even fly out of the saw.
For optimum accuracy, use a clamp to secure the material in place. Clamps should be placed at the end of the material while making sure the clamps are not obstructing the blade’s path. If you don’t have a clamp, you can use additional pieces of scrap material as wedges. Place the wedges on either side of the material so that the pressure coming from the wedges holds the material firmly to the fence.
Finally, always double-check your positioning before you turn on the saw. Make sure that the material is firmly in place and that you won’t be cutting into any of the clamps or wedges. When done properly, positioning the material will ensure a successful and safe miter saw experience.
Securing the Material is essential to a successful cut on the miter saw. To ensure the material is properly clamped and secure, you’ll need a few tools. Start by gathering a clamp and protective work gloves.
Using the clamp, attach the material you’re about to cut. Doing this will secure the material to the saw, allowing for a safer and more precise cut. Make sure to tighten the clamp firmly, but not so much that the material is damaged.
Once the material is clamped, you’ll want to put on your protective work gloves. This will help keep your hands safe from the saw and any potential splinters or sharp edges.
Finally, make sure to double-check the material is secure and in the correct position. It’s important to make sure the material is held firmly and not moving around as you cut.
By taking the time to properly secure the material on a miter saw, you’ll be able to make a successful and accurate cut.
Adjusting the Clamp is the next step in properly clamping material on your miter saw. First, make sure the clamp is firmly attached to the saw. Then, adjust the clamp to the appropriate size for the material you’re using. Loosen the clamp’s screws and slide the clamp back and forth to fit the material. Be sure to tighten the screws after adjusting the clamp.
Next, once the material is placed in the clamp, tighten the clamp’s handle to firmly secure the material. Make sure to exercise caution and only tighten the handle enough to hold the material in place. Over-tightening the clamp could cause damage to both the material and saw.
Finally, check your clamped material to make sure it is secure and won’t move during the cut. When you’re happy with the results, you’re ready to start sawing! With a properly adjusted clamp, you can now confidently begin cutting your material.
Using a miter saw is a great way to make precise cuts when working on a project. Whether you’re working on a piece of furniture, building a deck, or just making a few cuts for a DIY project, a miter saw is a must-have tool in your workshop. When it comes to making cuts with a miter saw, the key is to properly clamp the material.
Before you begin your cut, take a few moments to make sure the material is properly clamped down. You want to use two or more clamps to secure the material to the saw’s table. This will ensure that the material stays in place and won’t move during the cut. Once you’ve secured the material with the clamps, you’re ready to go.
When you make the cut, be sure to keep your hands away from the blade and make sure that you’re cutting in a straight line. If the material is securely clamped down, the blade should make a smooth and clean cut. Once the cut is complete, make sure to remove the clamps before you move the material.
Knowing how to properly clamp material on a miter saw can make all the difference when it comes to making accurate cuts. Take the time to clamp down the material securely and make sure to keep your hands away from the blade. This will help you make clean and precise cuts every time.
When it’s time to remove the clamp from the miter saw, you want to make sure you’re doing it properly. The first step is to loosen the clamping knob so that the clamp can be easily detached. Make sure to use a flathead screwdriver if the knob is too tight. Then, you can slide the clamp off the saw’s surface.
Once the clamp is removed, you’ll want to clean off the surface of the miter saw with a damp cloth. This will help ensure that no dust, debris, or other small materials get stuck in the saw’s grooves and cause it to malfunction.
Next, you’ll want to check the clamp for any signs of damage. If you notice any cracks or deformities, it’s best to replace the clamp to avoid any potential safety hazards.
Finally, when you’re ready to reattach the clamp, make sure to secure it firmly. You can do this by tightening the clamping knob until it’s snug – but not too tight. This will help ensure that the clamp is properly secured and your material is well-supported.
Removing the clamp from a miter saw is a straightforward process, but it’s important to make sure you’re doing it properly. Make sure to loosen the clamping knob, clean the surface of the saw, check the clamp for any damage, and secure it firmly when reattaching. That way, you’ll be able to get the most out of your miter saw and ensure your materials are well-supported.
Once you’ve got your material clamped securely onto your miter saw, it’s time to make the cut! Be sure to double-check the saw’s settings before you begin, as you want to make sure you’re making the exact cut you need. You can adjust the saw’s angle and depth to get the desired results.
Once you’re satisfied with the settings, it’s time to make the cut. Make sure your hands and arms are clear of the blade, and then turn the saw on. Keep your hands steady and guide the material through the blade, being careful not to apply too much pressure. If the material is not moving through the blade, be sure to check the blade and make sure it is sharp and not dull.
Once you’ve made the cut, turn the saw off and unclamp the material. Inspect the cut to make sure it is accurate, and if needed, make any adjustments to the saw’s settings and try again.
Setting up a clamp on your miter saw is a simple process. First, attach the clamp to the saw base. Next, adjust the clamp so that it lines up with the miter saw blade. Finally, tighten the clamp to secure the material you want to cut.
When clamping material for a miter saw, it is important to use the right type of clamp. You should use a miter saw clamp that is designed specifically for miter saws, as they provide the best hold. Look for a clamp that has a flat bottom and a large throat opening to make sure it is able to securely hold wide pieces of material.
Using a miter saw to securely hold material in place requires an appropriate miter saw clamp. To use the clamp, attach it to the saw’s base, then adjust the clamp to fit the material. Place the material on the saw’s table and adjust the clamp to firmly hold the material in place. Make sure the material is secure before you begin cutting.
To adjust the miter saw clamp to fit your material, loosen the knobs on either side of the clamp and then slide the clamp to fit your material. Secure the clamp by tightening the knobs. Make sure that the material is flush with the saw base before you begin cutting. Double-check the tightness of the knobs to make sure that your material is held securely in place.
Once you have securely clamped your material on the miter saw, it’s time to start cutting. Make sure to keep your hands away from the blade and use the saw’s guard for protection. Always double-check your measurements before cutting. Once you’re ready to start, turn on the saw and slowly guide the material through the blade. When you’re finished, turn off the saw and unclamp your material.
Now that you know how to properly clamp material on a miter saw, you can start making beautiful cuts with perfect accuracy. Before making any cuts, always double check that the clamps are secure and that the material is firmly held in place. Make sure you always use the right blade and adjust your saw’s bevel angle to the desired angle. Once you have all of these steps down, you can start making accurate and precise cuts with confidence.