Beautiful Plants For Your Interior
Beautiful Plants For Your Interior

Do you know what separates a basic woodworking project from a professional one? It’s the advanced techniques like creating miter joints that take your work to the next level. If you’re ready to elevate your skills and create flawless miter joints for your next project, you’re in the right place!
Before we delve deeper into advanced table saw techniques for creating miter joints, let’s understand what they are and why they are important. But first, safety first, we’ll discuss essential safety measures that you should follow while working with a table saw.
Once you’re aware of the safety rules, the next step is preparing the saw and material. We’ll guide you through the steps to ensure your saw and material are ready for creating miter joints.
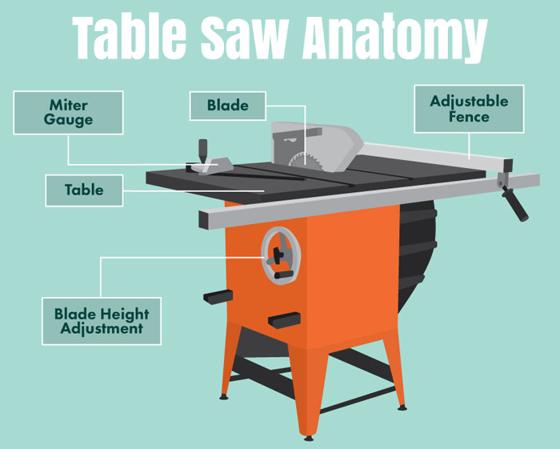
Now comes the most crucial step – setting the miter gauge angle. As every corner is different, we’ll teach you how to customize the miter joints for different corners to achieve a perfect fit.
We’ll then dive into the step-by-step instructions to guide you through the process of creating miter joints flawlessly. But sometimes, things might not go as planned. That’s why we’ve included tips for troubleshooting common miter joint issues.
Lastly, we’ll provide some tips for fine-tuning your miter joints that’ll help you attain a professional finish that’s sure to impress.
Ready to take your woodworking skills to the next level? Let’s get started!
When you need to join two boards at an angle, miter joints are your go-to option. They provide a neat and clean finish, with no visible seams or joints. A miter joint is created by cutting two pieces of wood at a 45-degree angle, which creates a perfect 90-degree angle when put together. Miter joints are commonly used in various woodworking projects such as picture frames, frames for doors, windows, and cabinets.
When it comes to woodworking, precision is crucial. Even a slight error in cutting the angles can lead to gaps and misalignments that ruin the look and quality of your workpiece. Therefore, it is essential to have a good understanding of miter joints before making them.
In the next section, we will talk about the safety measures you need to take before operating your table saw for miter joints.
When working with a table saw to create miter joints, safety should be your utmost priority. Misusing a saw can lead to serious accidents and injuries. Here are some safety measures you should abide by:
By keeping these safety measures in mind, you can confidently work on creating miter joints with your table saw.
Before we begin creating the perfect miter joints, it is essential to prepare both the saw and the material.
Start with ensuring that the table saw is set up correctly. Check the blade and make sure it is sharp and clean. Always remember to power off and unplug the saw before performing any maintenance or adjustments.
Next, select the type of saw blade you will be using. A fine-toothed blade is ideal for cutting hardwoods, while a blade with large teeth is better suited for softwoods.
Now, prepare your material. Double-check the dimensions of your material before cutting, and make sure it is free from any knots or defects that could compromise the structural integrity of the joint.
When cutting the material, be sure to use a push stick or a push block to keep your fingers safely away from the blade during the cut.
Taking these safety measures before beginning your project will help ensure that both you and your equipment are in optimal condition to create perfect miter joints.
To achieve the perfectly fitting miter joint, it is crucial to set the miter gauge angle accurately. The miter gauge is a tool used to guide the material at the desired angle for creating the joint.
To begin, loosen the locking mechanism and adjust the gauge to the required angle. You can use a protractor or angle finder tool to measure the angle. Once set, tighten the lock and double-check the angle before proceeding.
Take note that the miter gauge should always be at a 90-degree angle with the saw blade to prevent any unwanted cuts. Keep the gauge firmly pressed against the saw’s fence when cutting the material.
In addition, it is recommended to make a test cut on a scrap piece of material to ensure the accuracy of the angle before cutting the actual piece.
Remember, a slight variance in the angle may cause an ill-fitting joint, so take the time to set the angle correctly.
Next, let’s dive into customizing miter joints for different corners, where you’ll learn how to adjust the miter gauge angle to create unique joint designs.
When it comes to customized miter joints for different corners, it’s important to have a clear understanding of the angle required for the joint. This angle can be calculated by first determining the number of edges of the object being worked on. For example, a four-sided object will need miter joints of 45 degrees, whereas objects with more or fewer sides will require different angles.
To make the process easier, it’s ideal to use a digital angle finder or a protractor. Once you have determined the appropriate angle, set your miter gauge on the table saw accordingly. When cutting the miters for the corners, it’s crucial to maintain a consistent angle throughout the process. This can be achieved by using a stop block or simply by marking the saw fence with a pencil.
It’s essential to note that the length of the board being used can affect the cut angles. Longer boards may need larger angles, while shorter boards may require smaller angles. Therefore, it’s crucial to take into consideration the length of the board and adjust the angle accordingly.
In addition, it’s important to consider the thickness of the material being used. If the material is thicker, you will need to adjust your saw blade height accordingly. This will ensure that the cut is precise, and the joint fits seamlessly.
By following these tips, you can create customized miter joints for different corners with ease and precision. Remember to take measurements carefully, and adjust the saw accordingly to ensure the perfect fit.
Now that you’ve understood the basics of miter joints and taken the necessary safety measures, it’s time to begin creating miter joints. Follow these step-by-step instructions to create a clean and precise miter joint:
By following these steps, you will have successfully created a miter joint. Remember to take your time and double-check all measurements and angles to avoid any mistakes. In the next section, we will discuss some common issues that can arise while creating miter joints and how to troubleshoot them.
Even with proper preparation and execution, miter joints can present problems during construction. However, addressing these issues promptly can help ensure a successful outcome. Some of the most common issues with miter joints include gaps between the joint, improper angle cuts, and uneven joint seams.
One solution to address gaps in the miter joint is to use a specialized filler that closely matches the color of the project material. A mixture of sawdust and glue is another option that can be utilized if a filler is not available.
Incorrect angle cuts can be amended by utilizing a digital angle gauge to verify the angle before making the cut. Double-checking the accurate setting of the saw blade and miter gauge angle can also remedy the issue.
Uneven joint seams can be easily corrected by using a hand plane to remove any excess material from the surface of the joint. A sanding block can be used afterward to create a smooth and polished finish.
By anticipating and addressing these common issues when creating miter joints, the end result will be a successful, sturdy, and aesthetically pleasing joint.
After you have created your miter joints, it’s important to take a step back and assess the quality of the joints. Follow the tips mentioned below to fine-tune your miter joints and ensure better accuracy:
By following these tips, you can create better and precise miter joints that will not only enhance the overall appearance of your project but will also add strength and stability.
In conclusion, mastering advanced table saw techniques like creating miter joints may seem challenging at first, but it’s definitely worth the effort. Being able to customize your miter joints for different corners and angles opens up a world of possibilities for your woodworking projects. However, safety should always come first when working with any power tools. Therefore, make sure to follow the safety measures outlined in this article and take your time to prepare the saw and material before making any cuts.
Setting the miter gauge angle correctly is a crucial step in creating accurate and tight-fitting miter joints. If you encounter any issues, refer to our troubleshooting tips, but do not be discouraged by some initial trial and error. Keep refining and fine-tuning your miter joints with our recommended tips, and you’ll be creating professional-looking joints in no time. Remember, woodworking is an art form that takes practice, patience, and passion. So put your skills to the test and have fun creating your next project using your advanced table saw skills!