Beautiful Plants For Your Interior
Beautiful Plants For Your Interior

Have you ever wondered how to create those perfectly crafted box joints on your woodworking projects? You know, the ones that fit together like puzzle pieces, forming a strong and durable bond that lasts for years. Well, wonder no more! In this article, we’re going to teach you everything you need to know about advanced table saw techniques for creating box joints.
First, we’ll introduce you to box joints and why they’re an essential aspect of woodworking. Then, we’ll discuss the right table saw for this technique and how to prepare it for box joint cuts. We’ll also show you how to measure your wood components and make the perfect cutting jig for box joints.
Once you have everything set up, we’ll guide you through the process of making box joint cuts and testing the fit to ensure a perfect connection. From there, we’ll cover the glue-up techniques and how to fine-tune your box jointed workpiece for a professional finish. Lastly, we’ll explore additional box joint applications that you can try out on your own.
Whether you’re an amateur woodworker or a seasoned pro, this guide will provide you with advanced techniques that you can use to elevate your woodworking to the next level. So, grab a cup of coffee, pull up a chair, and let’s get started!
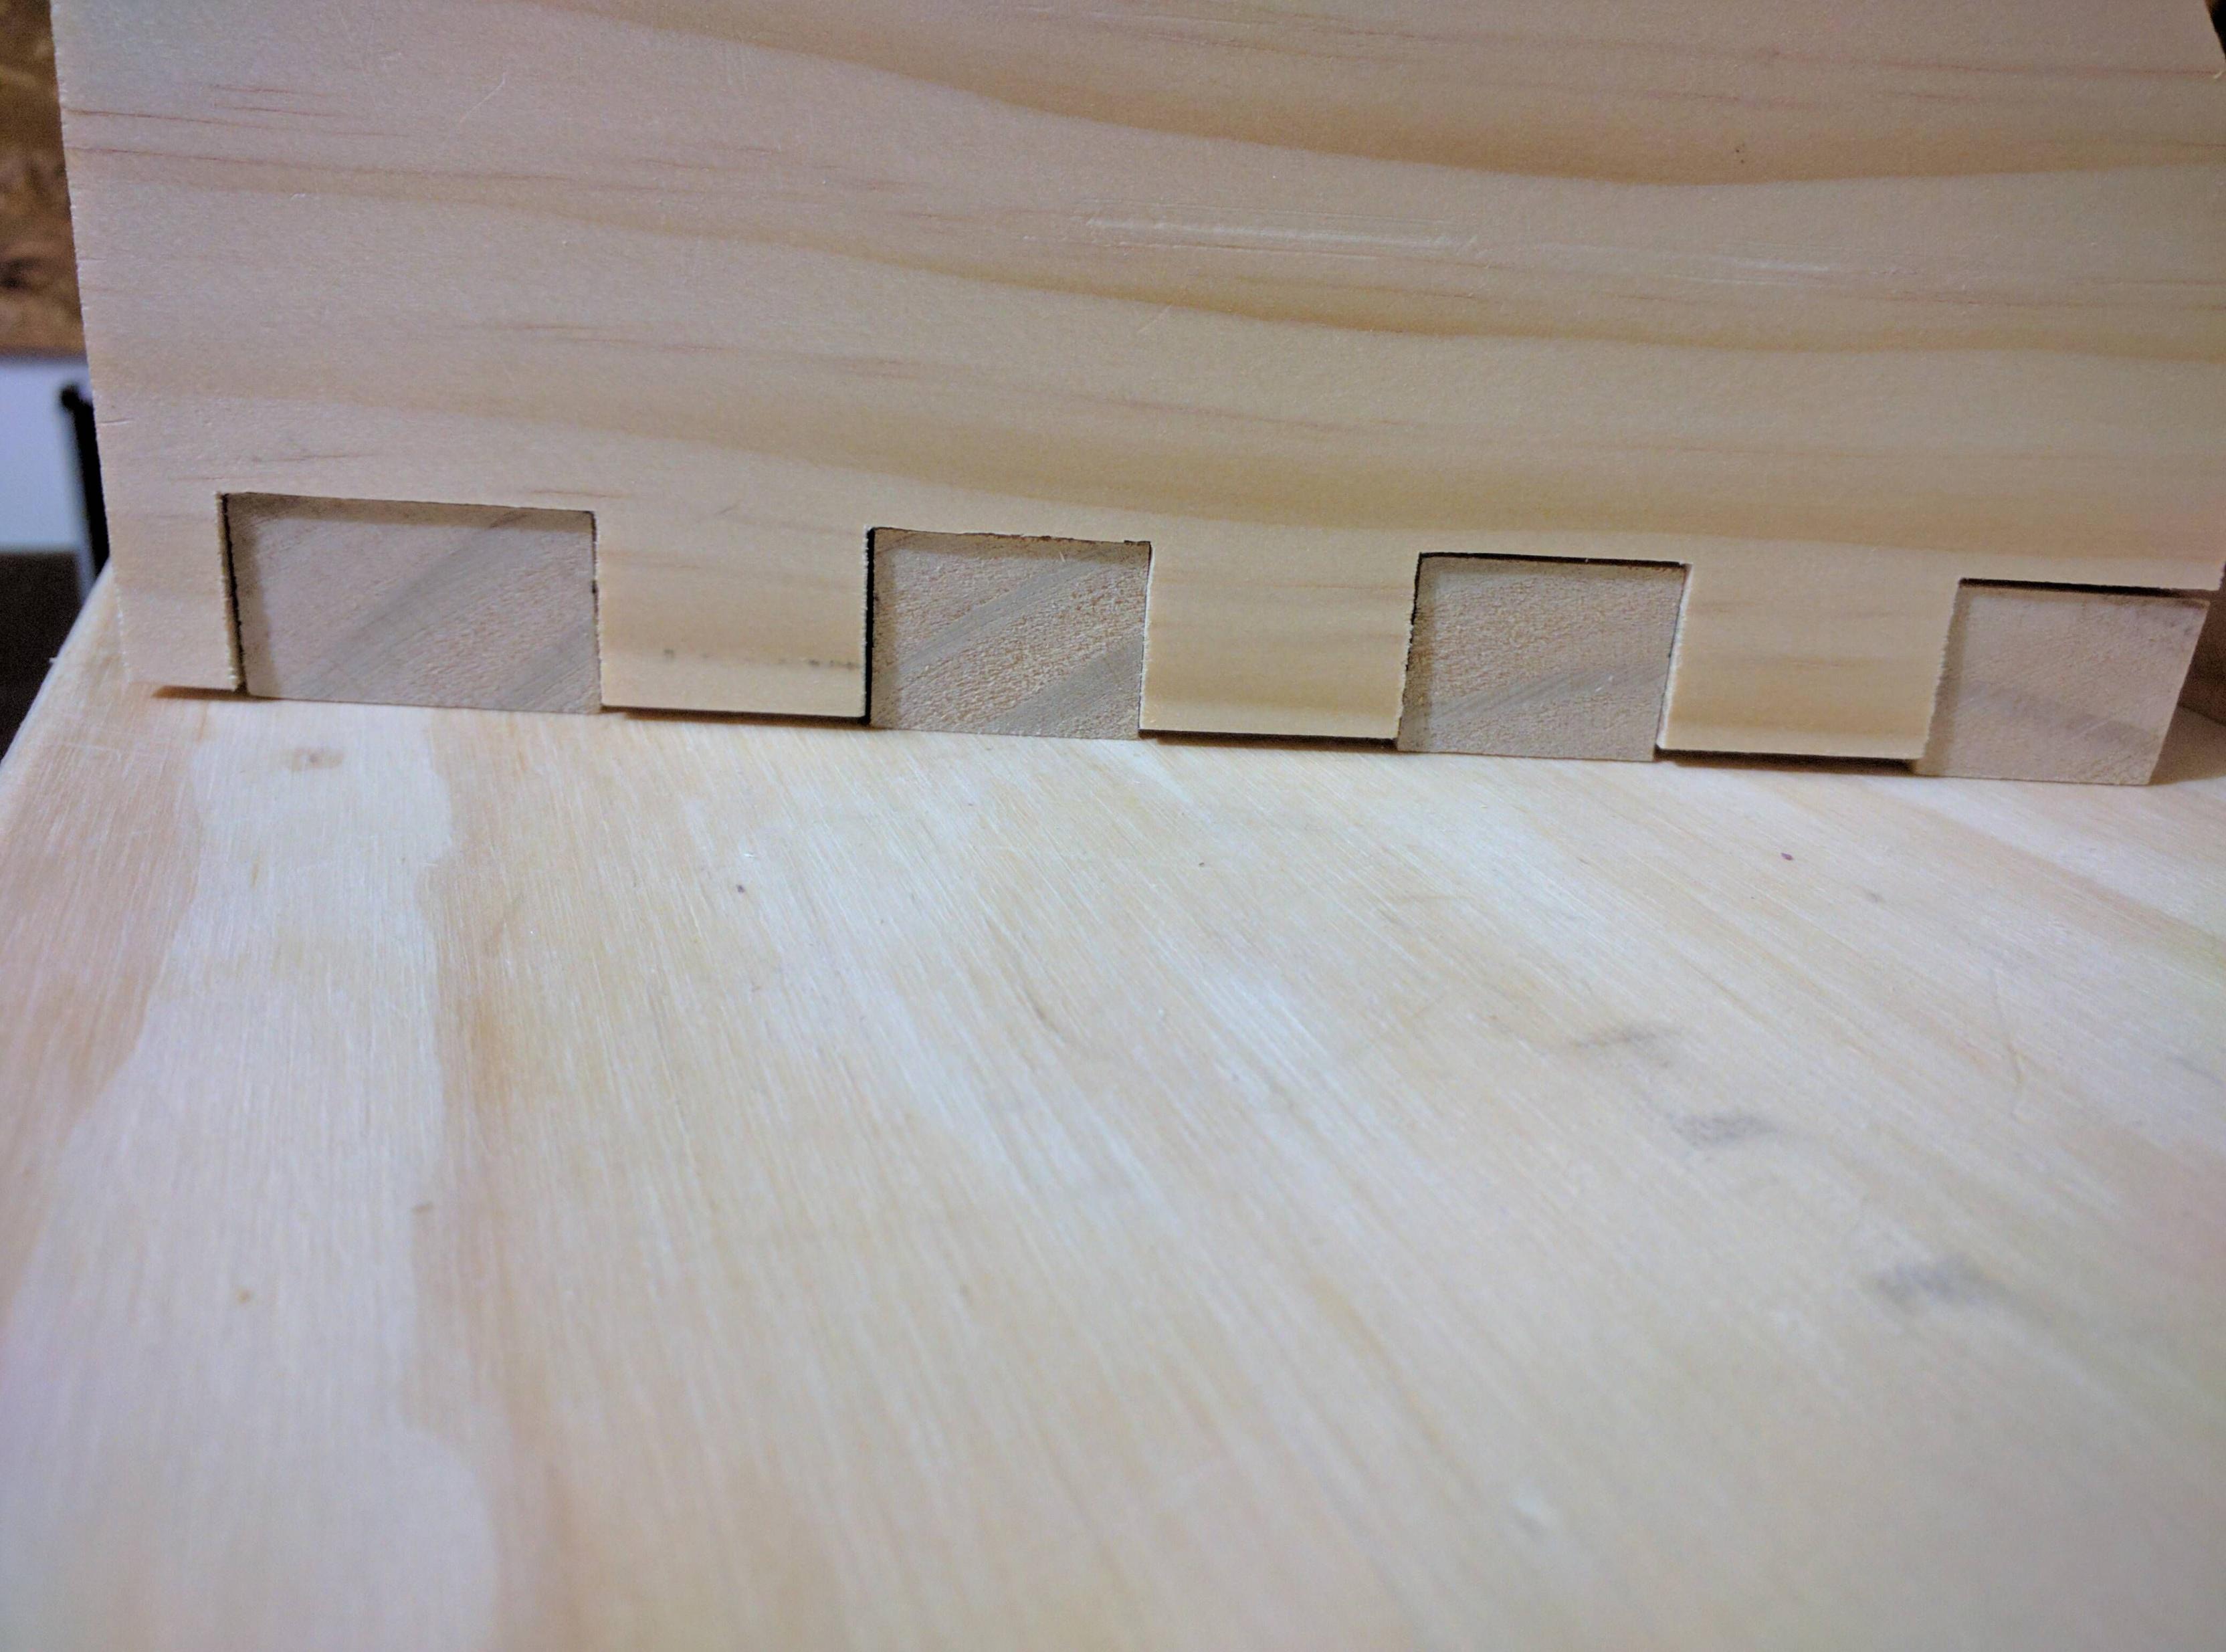
Box joints are a type of woodworking joint that is often used in the creation of strong and attractive boxes, drawers, and other furniture. Also known as finger joints, they consist of interlocking sets of square cuts that mesh together to form a tight joint.
Unlike other types of joints, box joints are relatively easy to create using a table saw and a jig, making them a popular choice for both beginner and advanced woodworkers. With box joints, you can create a seamless, interlocking joint that is both visually pleasing and incredibly strong.
So, in the following sections, we will discuss the different aspects of creating box joints. We will cover everything from selecting the right table saw to fine-tuning your box-jointed workpiece to achieve the perfect fit. By the end of this article, you should have all the information you need to create flawless box joints that will make your furniture stand out.
When it comes to creating box joints, the choice of table saw plays a crucial role in achieving successful results. Typically, you will need a table saw with a dado blade that is specifically designed for making box joints. The perfect table saw for box joints will have a powerful motor, rigid and flat surface, and sufficient cutting capacity to handle thick wood stocks.
It’s important to note that different types of table saws require different blades and dado sets. For instance, cabinet saws and hybrid saws may require a stacked dado set while contractor saws and job site saws work better with wobble dado sets.
For the best results, you may want to consider investing in a high-quality table saw with a precise fence system and reliable dust collection. A powerful and accurate saw will not only create perfect box joints but also make the process easier, safer, and more effortless.
In the next section, we will guide you on how to prepare your table saw for box joint cuts to ensure clean, precise, and repeatable results.
Before you start making box joints, it is essential to prepare your table saw for the task. Here are some simple steps to follow:
By following these steps, you can prepare your table saw for making box joint cuts accurately. In the next section, we’ll discuss how to measure wood components for box joints.
Before cutting the box joint, it is important to accurately measure the width and thickness of the wood components. The width of the components should be the same as the desired width of the box joint. The thickness of the components will determine the height of the joint.
It is recommended to use a digital caliper for measuring the width and thickness of the components. Measure each piece separately and label them accordingly to avoid any confusion during the cutting and assembly process.
While measuring the thickness, make sure to measure from the bottom edge to the top edge, as this will ensure that the joint will fit snugly together.
Accuracy in measuring the components is crucial for obtaining a strong and precise joint. A small mistake in measurement can result in a joint that is too tight or too loose, affecting the overall appearance and functionality of the final product.
In the next section, we will discuss how to make the cutting jig for box joints.
Once you have determined the measurements of your box joint wood components, it is now time to create the cutting jig. This is an important step to ensure that your cuts are precise and consistent.
To create the cutting jig, you will need a piece of scrap wood that is at least 1/2 inch thick, as well as a combination square, a pencil, a drill, and a 1/4 inch drill bit.
Start by measuring and marking the center of the scrap wood. Then, using your combination square, draw a line perpendicular to the center mark. This will be your reference line for the box joint cuts.
Next, measure and mark the distance between the blades of your dado set. This will determine the width of your box joint cuts. Use a drill and 1/4 inch bit to create two starter holes along the reference line, one at the beginning and one at the end of the joint.
Then use the combination square to draw a line between the two holes, parallel to the reference line, to mark the width of the cuts. You can repeat this process along the reference line, creating a series of equally spaced starter holes.
Now, align your dado set blade with the first starter hole, and make your cut. Repeat this process, using the starter holes as your guide, until you complete the entire cut.
Pro Tip: Using a push block to guide your jig through the table saw will help to protect your fingers and ensure even, consistent jig cuts.
Creating a cutting jig for box joints may be time-consuming, but it’s a necessary step to achieve the accuracy and consistency you need for truly professional results. Once you’ve finished making it, move onto the next step: Setting up the Box Joint Jig on the Table Saw.
After creating a cutting jig for your box joints, the next step is to set it up on the table saw. The setup process can be time-consuming, but it’s essential to ensure the jig is accurate and safe to use. Follow the steps below to set up the box joint jig on the table saw:
Once you’ve set up the box joint jig on the table saw, you’re ready to start making box joints. Remember to always prioritize safety when working with power tools and to test your jig before making cuts on your actual workpiece.
After you have set up your box joint jig on the table saw, it’s time to make the actual cuts. It is essential to ensure that you have made all the necessary adjustments and have the right blades and dado stacks in place.
When you begin making the cuts, start with the outermost edges and work your way towards the center. This approach will ensure that the exterior box joints are appropriately aligned and achieve a perfect fit.
Use a push stick to push the wood component through the blade to ensure your safety. Also, ensure that the table saw blade is sharp enough to make the cuts cleanly and avoid any tear-outs.
Start with a few light passes, gradually increasing the blade height after each pass until you achieve the desired depth for the box joint. Remember, cutting too deep or too little can result in a bad fit.
Take time to ensure the box joint cuts are precise to achieve an excellent fit. Once you have completed the inner box joint cuts, repeat the same process for the outer box joint cuts.
Now that the box joint cuts are complete, it’s time to test the fit and proceed to the next step of gluing up the box jointed workpiece as we discuss in the following section.
Once you’ve finished cutting the box joint pieces, it’s time to test the fit. The goal is to create a strong, seamless joint with minimal gaps between the pieces.
To test the fit, align the box joint pieces and carefully slot them together. If the joint fits together tightly and seamlessly, then you’ve done a great job. If there are gaps present between the pieces, adjust your saw to fine-tune the cutting width until the joint fits perfectly.
Additionally, you can check the squareness of the joint by using a square tool against the corners of the joint. If the joint is square, the corners should form a perfect right angle.
Remember, perfecting the fit may take a few rounds of adjustment and testing, but the result will be a strong and visually pleasing joint.
After you have ensured that your Box Joint pieces fit together snugly, using glue helps ensure their permanence. Fortunately, gluing up Box Joints is a simple process. However, adequate preparation and the right technique will go a long way in making sure that the joint is strong and stable.
Firstly, apply wood glue, spreading it evenly across the joint’s surfaces with a disposable brush. Once the surfaces are well-coated, squeeze your workpieces together, allowing the glue to spread as you clamp. Furthermore, your choice of clamp is crucial in the glue-up process. You will need a clamp that can exert sufficient pressure to pull the Box Joint together, closing any gaps that might have resulted from handsaw cutting.
Quality clamps are an essential investment that will come in handy for several projects. Pipe clamps, Bar clamps, and Parallel clamps are commonly used for gluing wood projects. For Box Joint projects, a Parallel Clamp is the best bet. This type of clamp provides excellent pressure evenly distributed across the joint surfaces, which is essential for strong joint bonding.
Before applying glue, always remember to prepare your working area. Surface preparation includes applying wood wax to the workbench or any other working area to prevent wood glue from permanently sticking to these spaces. In conclusion, a properly glued-up Box Joint will result in a wood project that will last for years, so it is essential to invest time and effort to prepare the joint surfaces adequately and to use the right glue and clamp techniques.
After the glue has dried off, you need to trim off excess wood on the outer edges of the joint. Use a sharp chisel to carefully chop off any remaining protrusions on the jointed surfaces to get the perfect fit. Do not apply too much pressure as it can cause splits and denting.
After trimming off the excess wood, you need to check for any gaps or irregularities at the corners of the joint. Unevenness can be fixed by sanding with fine-grit sandpaper. Make sure to sand both the sides and edges of the joint until your fingers can’t feel any bumps or roughness on the surface between the pieces.
Alternatively, you can use a hand plane or router to remove the rough patches on the box jointed workpiece. Use a low angle hand plane and take light cuts down the length of the joint fingers. This will help eliminate any irregularities on the jointed surface.
Once you’ve fine-tuned the box jointed workpiece, you can use it for various applications such as building boxes, drawers, frames, and much more. Remember to practice and experiment with your box joint technique. With patience and persistence, you will achieve the perfect fit for your box joints.
Box joints are incredibly useful and can be used in a variety of applications apart from just creating boxes. With its strong interlocking fingers, box joints can be used to create drawer boxes, frames, cabinet doors, and even guitar necks. The possibilities are endless, and it all depends on your creativity and imagination.
Apart from its functional uses, box joints can also be used to give decorative accents to your woodworking pieces. By varying the size and spacing of the fingers, you can create unique and visually pleasing designs. Woodworkers can also use contrasting types of wood to accentuate the box joint for a more elegant and refined look.
If you’re looking to take your woodworking skills to the next level, box joints are a great technique to master. By practicing and experimenting with this advanced technique, you can expand the range of projects you can produce and satisfy your creative itch.
In conclusion, creating box joints may seem intimidating, but with the right techniques and tools, it can be a fun and rewarding woodworking project. From choosing the right table saw to optimizing your cutting jig, every step is essential for achieving precise, clean cuts for your box joints. Measuring and testing your components, as well as fine-tuning your workpiece, will ensure your joints are secure and sturdy.
Box joints have various applications, and they offer the unique ability to create intricate designs and robust structures. Whether you are building a box, cabinet, or other woodworking project, box joints add an attractive and professional finish.
Remember that as with any woodworking project, patience, practice, and proper safety measures are crucial. Therefore, take your time, practice, and don’t hesitate to ask for help if needed. With these advanced table saw techniques, creating box joints is a skill you can master and improve upon over time. So, let the sawdust fly, and have fun creating beautiful and functional box joints!