Beautiful Plants For Your Interior
Beautiful Plants For Your Interior

To replace the carbon brushes on a miter saw, follow these steps:
If you are a woodworking enthusiast and have been using a miter saw for a while now, you might have noticed some problems like reduced power, strange noise, or a burning smell. These issues are often due to the carbon brushes that transmit current to the motor being worn out. But don’t worry, replacing carbon brushes is a relatively easy and affordable process that can save you a lot of money and time. In this guide, we will explain how to replace the carbon brushes on a miter saw step by step.
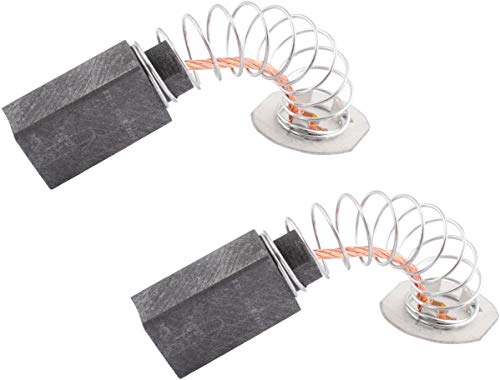
Before we proceed to the replacement guide, let’s understand what carbon brushes are and their function. A carbon brush is a critical component of an electric motor, including the one in a miter saw. It’s made of carbon material and has an arm that presses against the commutator, a circular metal part on the motor’s rotating shaft. The carbon brush conducts the electric charge from the power source to the commutator, which then transfers the charge to the motor windings, resulting in the spinning of the blade. The brush constantly rubs against the commutator, which causes it to wear out over time and requiring replacement.
Like any other motor parts, carbon brushes age and wear out with use. You should check your miter saw’s carbon brushes periodically and look out for warning signs indicating that they need to be replaced. Here are some indications that your carbon brushes might be nearing the end of their usable life:
If you observe any of the above symptoms, you should start planning to replace the carbon brushes for optimal and safe performance.
Before we start replacing the carbon brushes on your miter saw, you’ll need the following tools:
Here are the steps to replace carbon brushes on your miter saw:
Before you begin, ensure that the saw is unplugged and stopped to avoid any electrical shock or injury.
Access the brush caps that cover the brushes, which are usually located on the sides of the motor housing. Remove the caps using your pliers or screwdriver and keep them in a safe place.
Gently pull out the carbon brushes from the holders using your pliers or fingers, being careful not to damage the brush holder. Observe and note which brush is on which side, and keep them in separate piles if replacing both at once.
Take a soft cloth to wipe the dust and debris from your carbon brushes and brush holder to make sure nothing interferes with their conductivity.
Insert the new brushes into the holders, making sure they are correctly oriented before pushing them in as far as possible. Note that some brushes have a groove on one side to make sure they are correctly aligned.
Reinsert the brush caps by snapping them into place or using screws. Test that the brushes are positioned correctly by gently spinning the blade by hand before plugging back your saw and testing it out.
Once the saw is working, check the owner’s manual or service manual to see if further steps need to be taken, like resetting an automatic shutoff system.
By following these detailed steps, you can comfortably replace carbon brushes on your miter saw without requiring professional help. This guide has taught you the worthiness of having functional carbon brushes for optimal performance and avoiding costly mistakes. Remember also to check your miter saw’s manual for proper care instructions to extend your saw’s life. By maintaining your saw well, you can improve both your safety and the accuracy of your saw cuts.
If you ever need to replace parts, repair or maintenance work, the service manual is a valuable tool. Companies like DeWalt and Makita have online manuals that make it easy to find specific details and parts info.